
Cedar Lined Closet - Project


Step-by-step instructions for installing cedar planks in a closet:
I love the smell of cedar. There’s just something about opening the closet door and having that scent waft toward me that’s calming. Maybe it’s because of those old cedar chests my grandmother had – the ones that held all the winter clothes in the summer and vice versa.
Whatever the reason, having a cedar-lined closet isn’t just good for your clothes – it’s good for your home’s sell-ability quotient. It’s a nice finishing touch that may give a potential buyer the nudge they need to want your house over a competitor’s.
You can add the smell and warmth of cedar to an existing closet without a lot of mess or trouble. Best of all, the job can be done in a weekend for under $200. The final price depends on the size of the closet, of course.
I prefer the cedar planks over the sheets also available. The price is a little higher, but the finished look is more elegant in my opinion, and looks more professional. Each package will cover about 15 square feet and costs about 1.50 per sf. The wood needs to be acclimated to the area in which it will be installed for about 48 hours, according to the manufacturer, so keep that in mind when planning your project.

The planks install using a tongue and groove joinery system and are held in place with finish nails. A compressor and finish nailer will make the job go much more quickly than using a hammer!

While you can use a handsaw to cut the planks, a small electric chop saw will also speed up the job!

Clear the Clutter
The first step is to remove everything from the closet. This is also a great opportunity to send some of those unused clothes and jackets to the local rescue mission or other charity.

Once the clothes have been cleared, it’s time to remove the bar. Most of them simply slip out of the brackets, but you may have to remove some screws or nails. Take a close look at each end before trying to muscle it out.

Once the bar is removed, the brackets should come down also. In the case of this closet, we could have left the brackets in and simply installed the cedar planks around them, I wanted it to have a polished look. The decision is yours when it comes to the closet you’re upgrading.
If you decide to remove the brackets, try to keep them intact. If they do end up breaking (like this one did), you can purchase or make a new one for just a few dollars.
Use a pry bar to remove a bracket held in with nails. Otherwise, remove the screws and remove the bracket.

Measure and Prep the Space
Next, calculate the total area of the walls you’ll be covering. The simplest way to accomplish this is to measure each wall individually and adding them up. Be sure to measure from the ceiling to the top of the baseboard and from corner to corner.


In this case, I multiplied 92 by 45 for a total of 4,140 square inches. Divide that by 144 (one square foot, or 12x12) and my final figure was 28.75 – just under 30 square feet, so I knew I would need two boxes of planks for this wall alone. Repeat this process for each area you’ll be covering and add the totals. This will tell you how much product to buy.
Some installers also suggest covering the ceiling and inside of the door for total protection. That, of course, is up to you, but I’ve found that by simply covering the walls, most of the critters and insects will avoid the area altogether!
While you’re letting the planks acclimate, give the closet’s interior a good cleaning. It’s also a good time to touch-up any areas that may need painting.


Install the cedar planks
Once everything’s clean, tight and bright, it’s time to start installing the planks. It’s best to start in a small, inconspicuous area so you can get a feel for how the planks got together and the proper nailing technique.
The planks range in length from 12 to 48 inches, so measure the width of the area at the baseboard and choose the shortest plank that fits.

Cut the plank to fit. Leave about 1/8th of an inch breathing room on either side to allow for expansion and contraction of the wood. Don’t force a plank that’s too long into the space – you’ll most likely crack it.

Starting at the bottom of the wall, lay the plank against the baseboard and use a level to make sure you start with a good base. In most cases, the baseboard itself will be level, but there’s no reason to chance it!

Install a finish nail every 8 to 10 inches about 1 inch from the bottom edge of the plank and again along the top. Traditionally, tongue and groove joinery would call for nails at an angle through the tongue, but these planks are a little too delicate for that.

The 18 gauge finish nails are small enough that they won’t be obvious once they’re installed. Besides, if someone’s looking that closely inside your closet – keep them away from the medicine cabinet!
Once the first plank is installed, measure for the second course above. Most people prefer the look of staggered lengths on a project like this. Locate one of the shorter lengths of cedar in the box and slide its groove over the tongue of the first course.
Position it at the far rear corner of the wall and space it about 1/8th of an inch from the corner, matching the course below.
Secure it with another round of finish nails using the same distance guide as the first plank. The only difference being that you won’t need to nail along the bottom edge of this plank or any of the subsequent courses.

Next, measure the distance from the end of this plank to the opposite wall and cut another short piece to fit. Slide it over the tongue of the plank below and against the tongue of the plank next to it.

Don’t try to jam the tongue and groove joints together. It’s best to leave a little “breathing room” in the joint to allow for expansion and contraction.
 Use the nailer to lock the plank in place.
For the next course, cut a plank to fit the entire width of the wall and install with the nailer. Continue this pattern to the top of the area. In this case, I stopped at the bottom of the shelves.


You can see that the vertical seams line up on the 2 courses of shorter planks above. This is fine in a small situation like this and will often be dictated by the lengths of cedar you’re dealing with out of the box. On the longer walls, I like to make sure the vertical seams are staggered within the next 4 or 5 rows. It makes it more visually interesting. It’s certainly not worth wasting wood over, though.
[Measuring Tips: Get an accurate measurement by using the tongue portion of the already installed plank as a starting point. Measure from this point to the wall, since the new plank’s groove will fit over this tongue. If you find that you’re constantly measuring boards too long, this may be the reason. Another easy way to measure is by holding the board to be trimmed upside down and marking the location where it will overlap the adjoining tongue. Cut the plank, flip it over and install.]


Once you’ve gotten the hang of installing the planks, let’s move on to the longer walls. I like to work in a clockwise direction around the closet, so the next wall will be the rear.
Again, cut, level and nail the first plank on the long wall. If your closet is wider than four feet, you’ll need to use more than one long plank, meaning both planks will have to be even across their top edges and leveled. Once you have an even base, make sure to stagger the vertical joints as described above.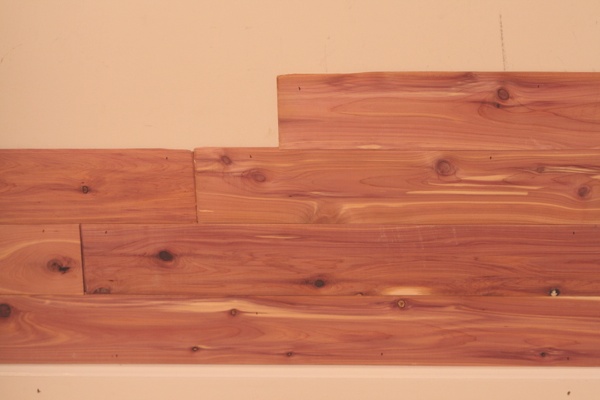
[Notice that by off-setting the joints by just a few inches on each course, you get a much more professional look. It also aids in securing the planks to each other and the wall.]
At the end of each course, remember to give the planks a little breathing room. Don’t crowd the intersecting wood against the cedar already installed. You’ll see a method to cover up small gaps in the next few steps.
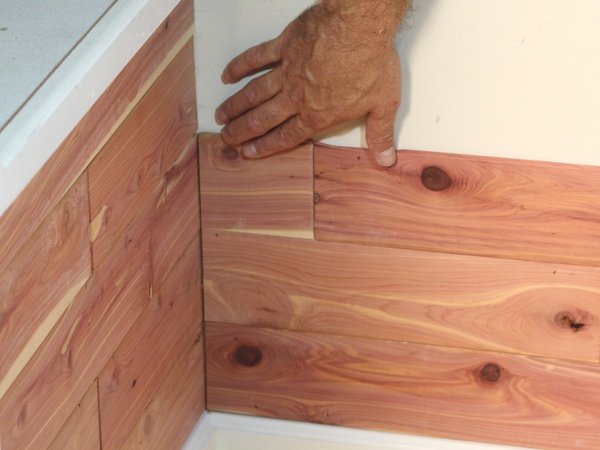
Notch out the planks to go around any obstructions, if necessary. The gap under this shelf was so small that it wasn’t worth notching. I was either lucky or good to get this close! And as I’ve heard said by wise men – “I’d rather be lucky than good!”

In some cases, you might find it easier to slide the cedar plank behind the obstruction. That’s what I encountered when working around this hanger bracket. The space was just too tight to slide the plank into.
If there’s not quite enough room, try using a handsaw or oscillating saw to widen the gap slightly. With the plank in position as a thickness gauge, use the saw to gently gnaw away at the wood trim.
 Once the obstruction is cleared, slide the plank into place and secure with nails.
Continue installing the planks until you come within a board’s width of the ceiling. In this situation, you could rip one of the planks down to fit the space, or you can simply use cedar trim to cover the gap.
 You've basically finished adding cedar planks to your closet. For more tips and for finishing touches on How to Create a Cedar Lined Closet - Part 2: CLICK HEREFor more projects like this, order Brad Staggs' book: Spend A Little, Save A Lot Home Improvements: CLICK HERE