
How To Seal Outlets and Switchplates


Sealing Electrical Outlets and Switchplates
Energy Saving Tips:
They seem so small and innocent, but in larger numbers, outlets can be energy thieves. Think of each one as being a hole venting directly to the outside of your home…and it could be as big as half an inch! When you add up the number of outlets in your home and think about the fact that air can pass through those little openings, letting both drafts inside and store-bought air outside, you can see that closing off all those little leaks might be a smart thing to do!
Seal Outlets:
The key to solving this problem is sold in packages that contain enough insulation material to do a number of outlets. They’re inexpensive and easy-to-install. All you need to do is pop out the perforated pieces and slide them into place. It’s literally a 3 step project! (4 if you count putting the outlet cover back on). Follow these steps to seal outlets.

1. Remove the outlet cover screw in the center. As always, be careful when working around electrical outlets, being sure to never put the tip of the screwdriver near the wires attached to the sides of the outlet. Doing so could give you a nasty jolt!

2. Remove the cover itself and set aside.

3. After removing the perforated cutouts on the insulation, place it over the outlet in the wall. It should fit snugly and remain in place without having to be held. A tight fit ensures maximum air leak-stoppage!

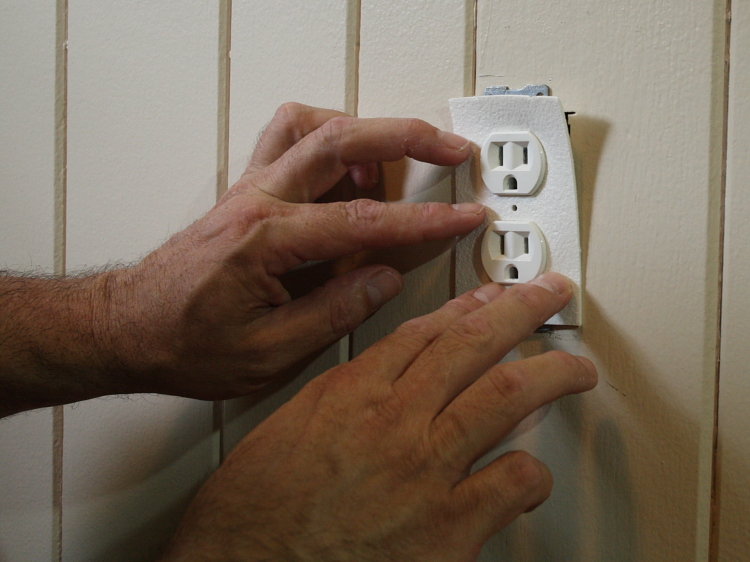
4. Replace the outlet cover. You may have to use some gentle pressure to get the screw to start threading through the insulation. This is normal, but be sure not to over-tighten it or you may crack the plastic cover. It’s not the end of the world if you do, but it’s best not to!


Sealing Switchplates
The same holds true for switchplates (or switchplates covers as they’re sometimes known). Because the back of the electrical box that they sit in has openings to the interior wall cavities, it’s possible for drafts and other outside contaminants like insects to find their way inside. For this reason, it’s a good idea to install the foam gaskets behind them, as well.
First, remove the screws and cover of the switch.

Next, separate the gasket and remove the excess material. Then, slide it over the switch, being careful to avoid the wire connections on the side.

 Finally, reinstall the switchplate and the job is done. Another project designed to save you money is in the history books.
For more home improvement projects and energy saving tips, get Brad's Book Spend A Little, Save A Lot Home Improvements buy clicking the "buy now" button below.